
Device Review: Accu-Chek Guide blood glucose meter
Why I’m Reviewing the Accu-Chek® Guide
I received an email offering me a free Accu-Check Guide. All I had to do was register online, get a prescription from my doctor, and go to my local pharmacy to pick it up. Easy.
Honestly, I wasn’t in the market for a new blood glucose (BG) meter. I’m perfectly happy with the one I use regularly. There’s only one thing about my current meter that I’d like to change. The meter I use doesn’t connect to my preferred BG logging app, mySugr. I have to manually enter my BG readings into the app
The email I received said the Accu-Chek Guide connects to mySugr. Not having to manually enter my BG readings? For free? Okay, I’ll try it out and see.
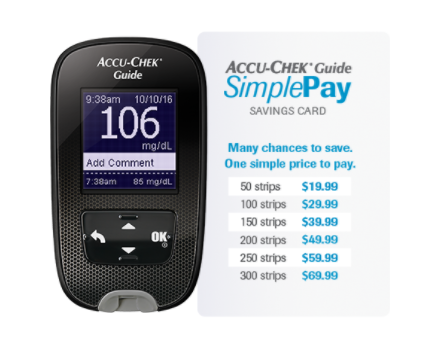
OK, it’s not exactly free
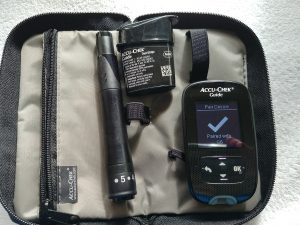
At the pharmacy when I picked up the meter I realized that this little experiment wasn’t going to be completely without cost. I had to buy some test strips. The meter came with batteries, a lancing device and lancets, and a generic carrying case. But it didn’t come with any test strips.
I gave the pharmacist my prescription for test strips, the manufacturer’s discount card, which was sent to me after I registered online, and asked for 100 strips. The discount price for 100 strips is just under $30, or about $0.30 each. But the pharmacy didn’t have that many strips in stock. I could only get a packet of 50 strips at just under $20, or about $0.40 each. I felt a little like I just got gypped by the pharmacy.
unboxing & set up
The Accu-Chek Guide reminds me of my first meter, which I got in 2009, the One Touch Ultra 2.
Both have the same menu system for set up and input. To move between the options on the menu you use the up and down button. To choose an option press the OK button.
Both have the same display screen set up. The time and date are at the top, the BG reading in big numbers is in the center, and any tags set are displayed at the bottom.
The basic process for setting the options is to go through preset menu options using the up and down button and then pressing the OK button to set the option you want. This process went quickly enough, but it felt a bit tedious. After correcting the time and making sure the meter’s language was set to English, the meter was ready to go.
BLUETOOTH
Bluetooth is the reason I wanted to try the Accu-Chek Guide. After all, I want the BG meter I use to be able to connect with my phone and transfer my BG readings to the mySugr app.
Setting up Bluetooth is done through a multi-step process using the meter’s Wireless menu under Settings.
First you connect the Default Device. For me, that’s my G6 cellphone. Choose Pair Device Now and the meter generates a PIN. With Bluetooth turned on, a pop up window appears on my phone with a field for the PIN. You got to be quick when entering the PIN or the pairing attempt times out and you have to try pairing again until it takes. Once successfully paired, the meter displays a big check mark.
Then you turn on Auto-Send in the meter’s Wireless menu, enabling your BG readings to be sent automatically to the default paired device.
Finally, if you have more than one device paired with your phone you have to set one of the devices as the default.
None of this is difficult. It takes a little time. If you’re not familiar with pairing you’ll have to dig out the instruction book, as there’s no help built into the meter menus. And if, like what happened to me, the devices time out you have to repeat the process.
Bluetooth establishes a wireless connection between the Accu-Chek Guide meter and your phone. For that connection to work, Bluetooth has to be turned on on your phone and your phone has to be within physical range of the meter.
That range seemed to vary. Sometimes it worked fine when the meter was in the bathroom and my phone on my nightstand in the next room. Sometimes not. I suspect this is due to the vagaries of Bluetooth and not the meter. Eventually, the BG readings did transmit to the phone without me doing anything to force it. Once the data transmitted I got a notification message on my phone.
The BG testing process is familiar
The basic process for testing is the same as with any other standard meter.
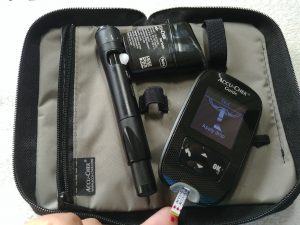
Insert a test strip into the meter and it turns on. The Accu-Chek Guide has a light in its test strip slot. Which is very handy when testing in the dark.
Wait for screen to tell you to the apply blood to the test strip. The Accu-Chek Guide is very responsive, coming on and prompting for the blood drop almost immediately.
Apply a drop of blood to the strip and wait for the reading. Again the Accu-Chek Guide is really quick to respond.
Once the BG reading The appears press OK to add a comment. The comment menu lists: before meal, after meal, fasting, or bedtime. After pressing OK a second menu appears that lists specific meals that can be added to the comment.
Pull the test strip out of the meter or push the eject button on the side of the Accu-Chek Guide, and dispose of the used test strip properly. And testing is done.
DATA REPORTING IS BASIC
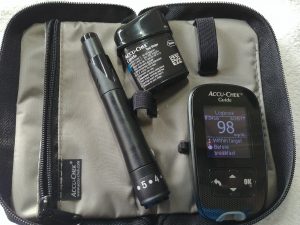
On the meter itself you can look at individual BG readings by going to the Logbook under the My Data menu.
First you’ll see a list of today’s BG readings with the most recent one at the top of the list. Scroll through the list using the up and down buttons. To look at a specific BG reading, press the OK button after highlighting the reading in the list.
When looking at the individual reading you’ll see the time, date, BG reading, any tags you set, and whether the reading was above or below target.
You can also see numerical displays of your average BG reading and the percentage of readings that are on target.
The Low/High Data displays a list of all BG reading that were either above or below the Target Range set for the meter.
the look & feel are familiar
The Accu-Chek Guide cycles through its process steps really fast. Insert the strip and the meter instantaneously asks for the drop of blood to test. Put a drop of blood on the strip and in a second or two you see the BG reading displayed on the screen.
As I mentioned above, the Accu-Chek Guide looks very familiar. Compared to the One Touch Ultra 2, it’s slightly more compact and a bit lighter in weight. I didn’t really like the feel of the buttons. They feel brittle to me and at first I had the impression that they might break.
THE INNOVATION IS IN THE ACCESSORIES
Oddly enough it’s in the accessories that the Accu-Chek stands out as innovative.
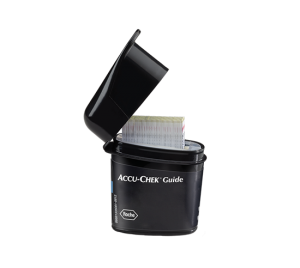
The test strip container is designed to be spill proof. Individual strips are lined up in a track and held in place with tension. Having the strips standing on end makes it easy to pull out one at a time. Because the strips are all lined up the same direction you’re always handling the end that has the blood drop reservoir. I found this handy because I didn’t have to think about which direction the test strip was oriented. I just slid it into the lighted slot on the meter.
 The lancing device is designed to be single click and pain free. Once I got used to the feel of it, I did find it easy to use and generally pain free. Something about having the wide end press against my finger tip felt counter intuitive. The lancets come loaded in a drum that goes into the lancing device so you don’t have to touch them before use. Each drum holds six lancets, clearly the manufacturer understands that people are not using a new lancet every time they test.
MY BOTTOM LINE
It’s an adequate meter: compact, easy to use, reliable. But there’s nothing about the meter itself or its accessories that would compel me to switch over.
There is one thing that does work against switching to the Accu-Chek Guide and that’s the cost of the test strips.
Even with the discount program the cost adds up. Generally, I test before and after meals plus at bedtime. That adds up to 210 tests/month. Add a few sessions of exercise or a couple of days feeling ill and I’m up to 250 test strips in no time.
I would need to buy at least 250 strips each month at just under $60. Which is twice my monthly co-pay for strips through my HMO. This cost is also more expensive than the current monthly fee for unlimited test strips through One Drop or Livongo.
DISCLOSURES:
I got the Accu-Chek Guide meter, batteries, and an Accu-Chek FastClix lancing device with 6 lancets for at no cost by using a promotional voucher from Roche Diabetes Care, Inc. I bought testing strips at a discount using the SimplePay savings card.
+ + +

Regardless of the utility of the meter, the best part is the FASCLIX. I love my FASCLIX. It is the bomb.
You’re referring to the lancing device.
It took me a while to get comfortable with it. Something about having the wide end be where the lancet comes out and pushing the button at the end (and not on the side) felt foreign to me.
I have to admit, once I got comfortable with it, the FastClix was pretty much painless.